Note: This document refers to the MapCreator version 1.x.
Click here for manual of MapCreator 2.0
By Elina Peltola, Customer Success Manager
We want to walk you through each step of mapping process and help you getting started with the blue dot.
IndoorAtlas technology uses consumer smartphones to sense the unique electromagnetic fields inside each building. The sensor signal from an end user device is compared against a high resolution map built with IndoorAtlas tools and algorithms to position the devices inside the buildings, with no infrastructure installations needed.
The Earth’s magnetic field is everywhere, it just needs to be recorded for the magnetic field map to be generated. The process is called “mapping”, which simply means recording the sensor data until you have good coverage of data all over the area where positioning is required.
Pre-mapping
For your first map select a venue with steel or concrete structures, venue you know and that’s not too big. Also, the venue shouldn’t be located too far from your work desk. Office and home are good options.
When you know which venue you want to map you have a few steps you need to do before the actual mapping can start:
Sign-in:
- On your desktop, sign-in or create an account at app.indooratlas.com
Create your location:
- In the ‘Locations’ tab, click on the top right button ‘+ Create Location’
- Enter the name of your venue. Be descriptive/accurate e.g. ABC Shopping Mall
- Add the address. Check the location is correct on the map. Drag the marker as needed
- Add a location description e.g. ABC Mall, Market Street
- Click ‘Next’
Add your floor plan:
- Name your floor plan. Be descriptive and accurate e.g. ABC Mall, 1st Floor
- Add the floor number (use the same numbering as the buildings elevator)
- Upload your floor plan image (PNG / JPEG format recommended)
- Click ‘Next’
- Align your floorplan image on top of your building as accurately as possible using the scaling and rotating icons in the corner of the image. To move the image, drag and drop using the middle icon. Scaling the image to the correct measurement is extremely important
- You can change to a different map view from the menu on the top right e.g. satellite view.
- Select your map provider from the menu (Google Maps not currently supported)
- Click ‘Submit’
In your ‘Location Overview’ tab, you will now see your location.
Important: If you need to add additional floor plans for your location, you do not need to add the location again. Just add a new floor plan for an existing location.
Mapping device
Minimum requirements for the mapping tool:
- Three sensors: accelerometer, gyroscope and compass
- Android version 4.3 (or later)
- iOS version 6 (or later)
Almost all modern high-end smartphones fulfill these requirements.
IndoorAtlas uses all available sensors including radio signals and air pressure sensing for positioning, even though a subset of this is usually enough to position a device. As iOS doesn’t support WiFi scanning, we recommend to use an Android device for mapping. At the time of writing, recommended smartphone devices for producing production quality maps: Nexus 5, Nexus 5X, Nexus 6, Nexus 6P, Honor 8, LG G4, Xiaomi Mi4 and OnePlus 2 (Android 4.3 and above). iOS apps can use maps created with Android for positioning, but if mapping is done with iOS, the benefits of WiFi data won’t be available for Android experience. For this reason we don’t recommend doing final production maps with an iOS device.
MapCreator 1.5
The IndoorAtlas MapCreator application version 1.5 can be found on Google Play Store and Apple App Store. This application is used for creating the maps and testing positioning.
![]()
![]()
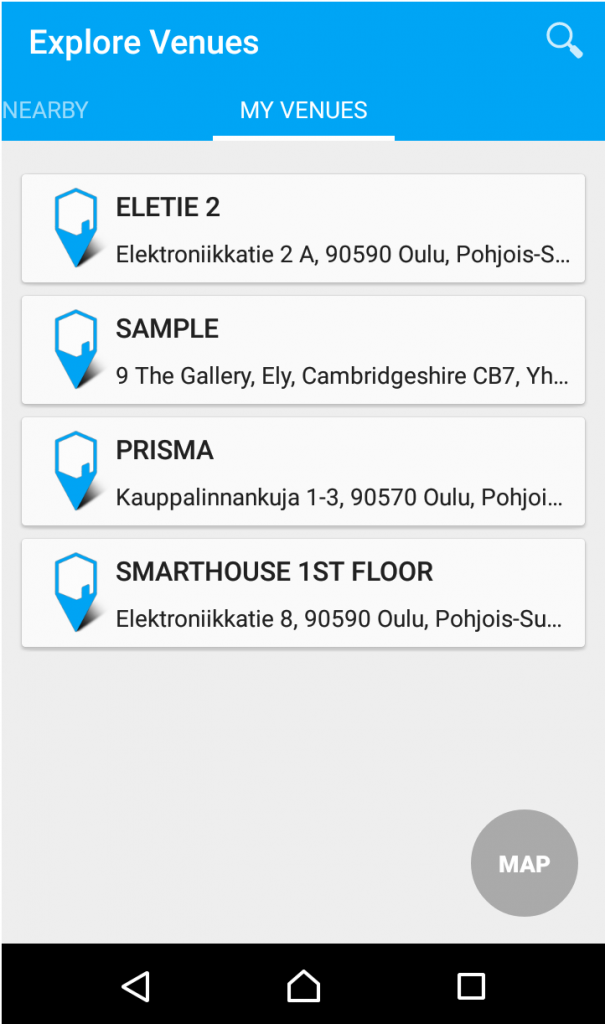
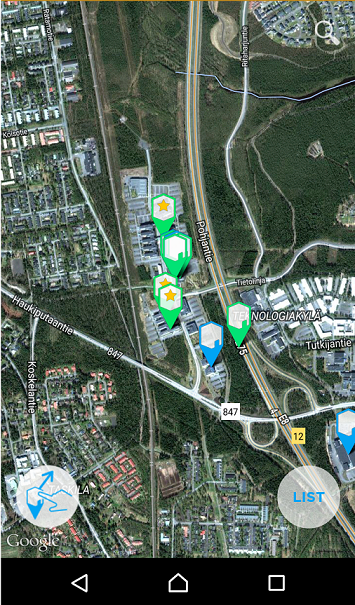
Login with your account and search your venue’s name in “LIST” view or search its address in “MAP” view. Open your venue and floorplan. If this is a new floor plan, “No map” will pop up on the screen since there is no magnetic field map available at this moment.
Calibration
Before you can record mapping data, the device will need 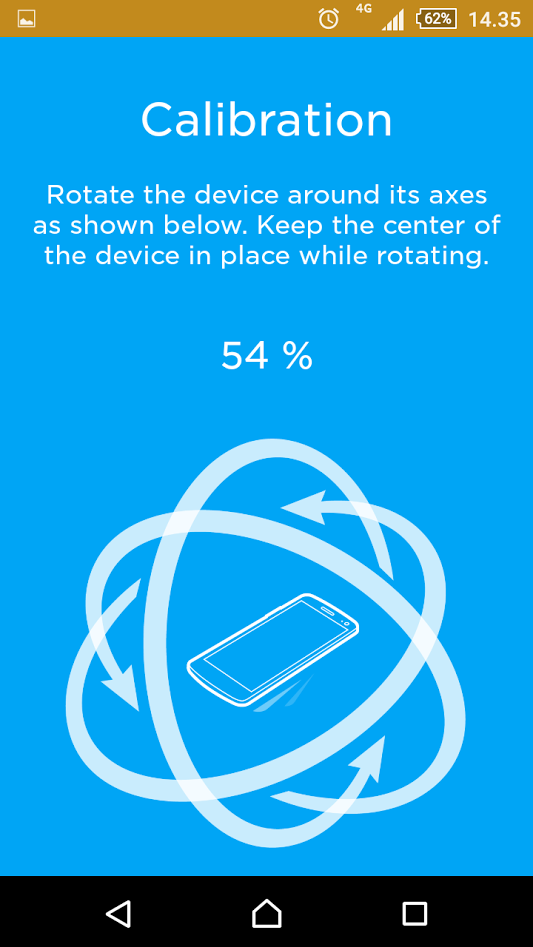 calibration. Rotate the device around each of its axes so that any interference of the case and electronics can be removed from the sensor measurements. During calibration keep a minimum distance of 1 meter from any structure/obstacle that could cause interference, like pillars or walls and remain stationary. Do not calibrate your device while inside a moving elevator or in an escalator. Because the sensor bias can change over time, a re-calibration is needed every 30 minutes during mapping. The calibration screen will pop up automatically when calibration is necessary during mapping.
Mapping
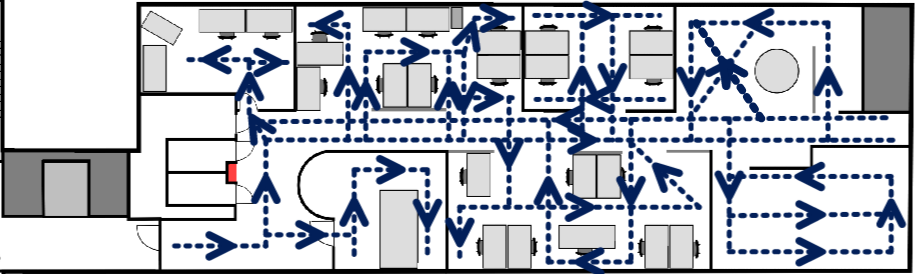
Mapping is recording sensor data in known positions. Plan to spend about 15 minutes for your first mapping session, after which you can try positioning to make sure the setup has been successful. Record one path in the middle of each corridor/aisle. You can start by having few long paths connected together and upload the map. Record a few test paths also so you can analyze your mapping results at IndoorAtlas Maps.
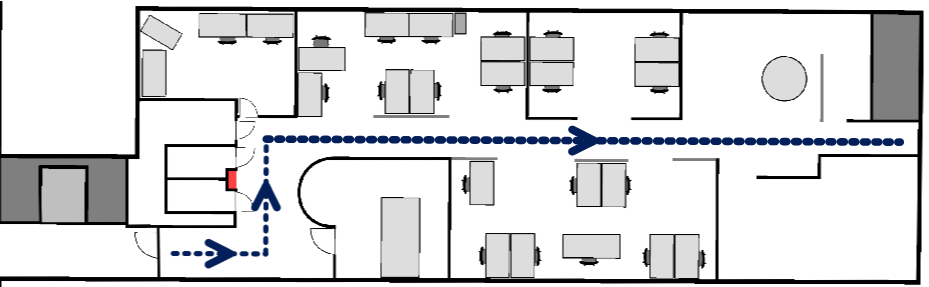
 Start recording a path by pressing the plus icon. Tap the screen to place the start marker on the selected spot. Tap the screen again to place the end marker. After this you can move the markers by selecting the marker with a tap and dragging your finger anywhere on the screen. After first path has been finished you can easily add first marker to the end of previous path by double tapping plus icon.
 Tapping eraser will remove last added marker or selected marker. Long press will clear all markers.
There are a few crucial rules to remember during recording a path: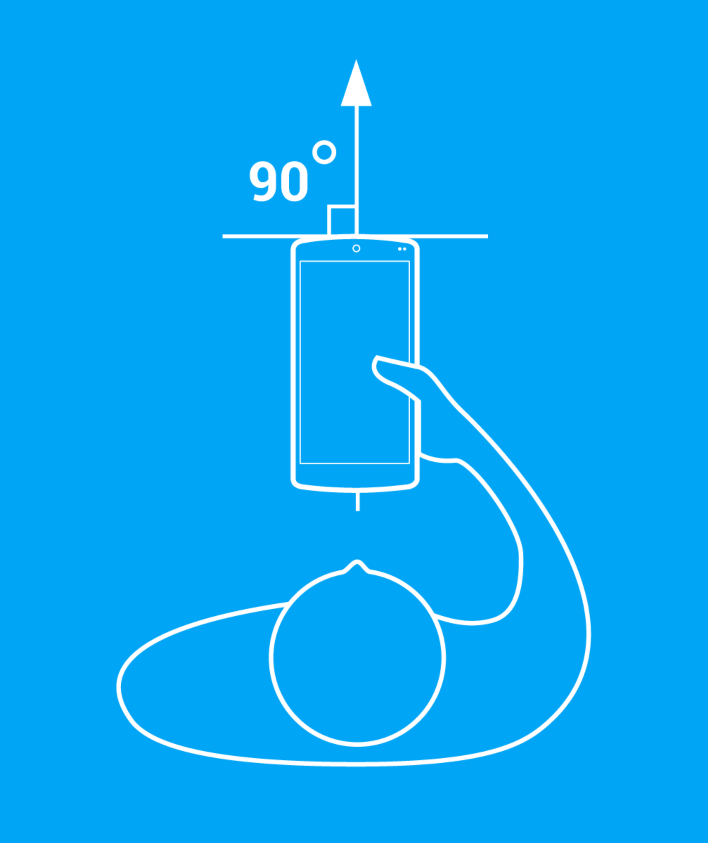
1. Keep phone straight ahead in front of you directed along the marked path with as little waving and shaking as possible. This is where the direction of the drawn lines is used to place the recorded data on a sensor map. This is the base of magnetic positioning and if phone was not aligned with the path at the recording, this will cause an error in the data map.
2. Start walking immediately after pressing record button and press stop immediately when reaching the end of path. Maintain a steady, natural speed throughout the recorded path. The recording time and path length sets an average speed for the path. Hesitating at the beginning, end or during the path, or diverting from the intended path will misplace the measured data and result in positioning inaccuracy for the final map.
3. Connect recorded paths together to help the final map contain information of walkable areas and to determine obstacles and walls. This is easiest by double-tapping the “add path” button to place the start marker on top of the end marker of the previous path. Any gap wider than 1.5m between paths will be treated as an obstacle which prevents the blue dot from moving between the paths.
4. When possible, maintain a comfortable 1m distance from walls while walking along a path. This will help the positioning algorithm maintain the blue dot away from walls as users rarely hug the wall when traveling naturally.
 After you have recorded the paths, upload the data to the server by pressing the cloud icon.
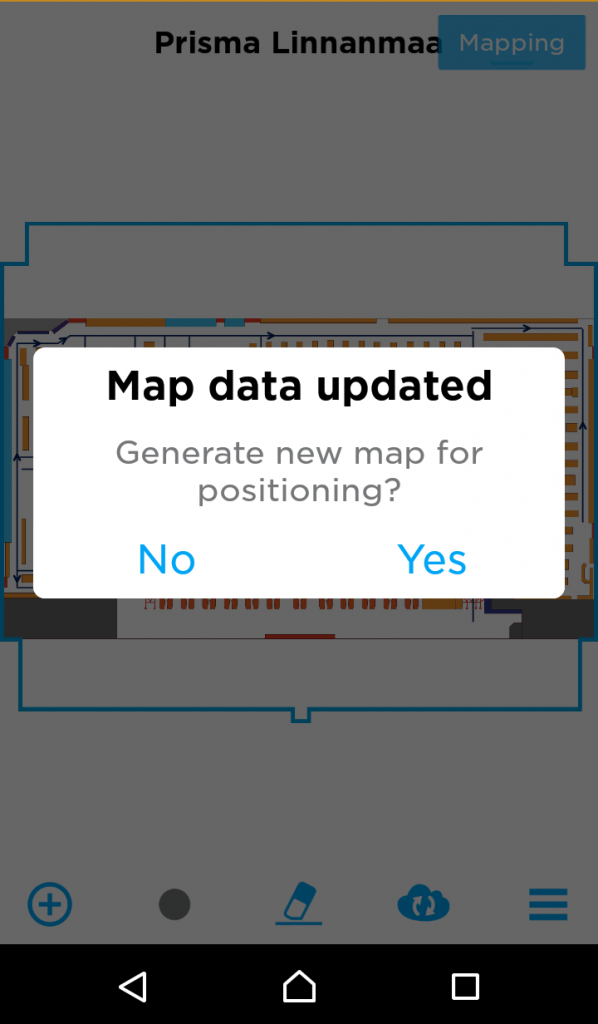

After the map data has been updated, press “Yes” in order to generate a map for positioning.
![]()
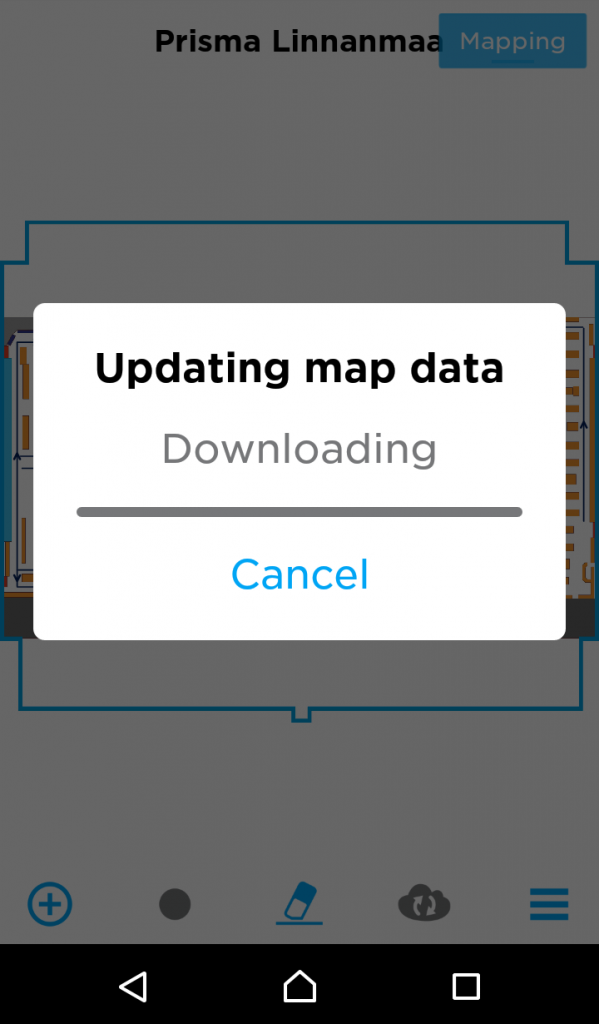
This icon indicates that map generation process is running. When map generation has finished the icon will disappear and your map is ready for positioning.
Observing the results
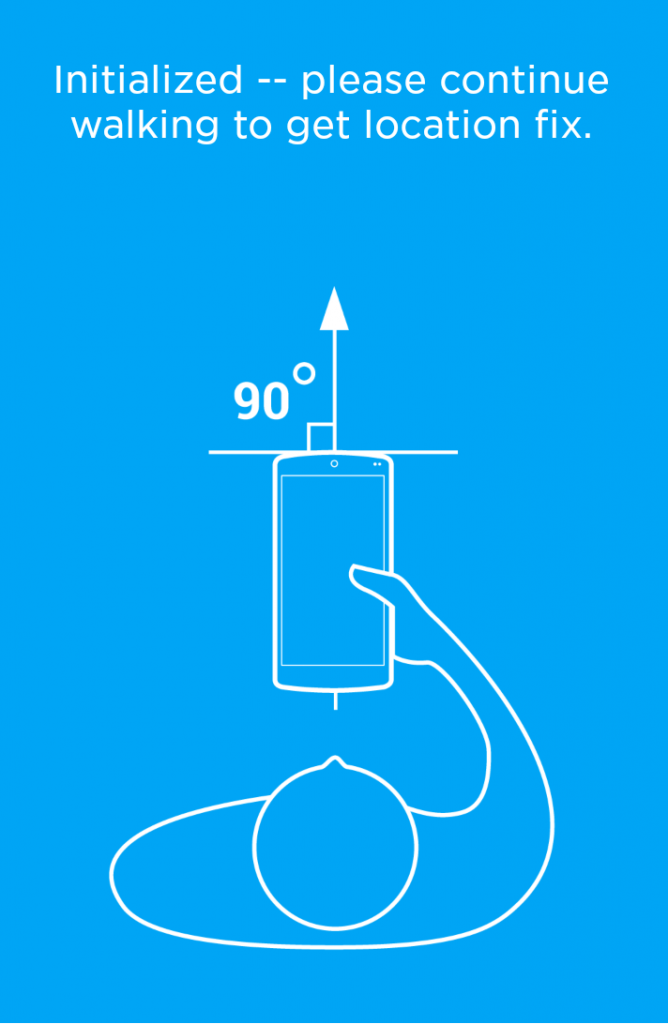
You’re almost done! Go to positioning mode from the app’s menu and press the play button to start the positioning. For the first map walk along mapped paths and keep your phone directed along the paths. It is important to keep the phone directed straight ahead in front of yourself and have a solid Internet connection during this process.
Right after pressing the play button the blue dot might be jumping around your map, but don’t give up. As you walk further in the mapped area, the position gets more accurate. Due to the fact that magnetic field might have same features in different areas, a single measurement isn’t enough to identify which part of the magnetic data map your current spot matches the best. So you need to keep walking for the blue dot to converge with your actual location. After successful experience you can extend your map by adding more paths and making it more complex.
Related articles: Map Accuracy Analysis, MapCreator 1.x UI Guide, Mapping Bigger Areas,Troubleshooting